Acrylic Keychain Charm: Substrate First, Artwork Second
Acrylic Keychain Charm: Substrate First, Artwork Second
Why choosing your board material before finalising art changes every design decision.
TL;DR
Custom acrylic keychain charms from Popecho are CNC die-cut from your chosen substrate — clear, glitter, rainbow, mica, starry-sky, or chameleon — across 10 sizes from 3 cm to 15 cm. The most consequential decision is picking your board material before you finalise artwork, because glitter, chameleon, and rainbow boards contribute active texture and colour-shift that interacts with your print layer. Open your variant in Popecho's onsite editor, lock in your substrate, confirm the hardware-hole zone, then build the art around both.
What This Subtype Actually Demands
Acrylic keychains share a family resemblance with standees and badges, but the integrated hardware hole changes the layout rules immediately. The charm is designed to hang and rotate freely — which means both faces are visible to whoever holds it, and the top-edge zone must stay clear for the ring or hook attachment. That hardware constraint is not just a bleed note; it shapes your entire composition.
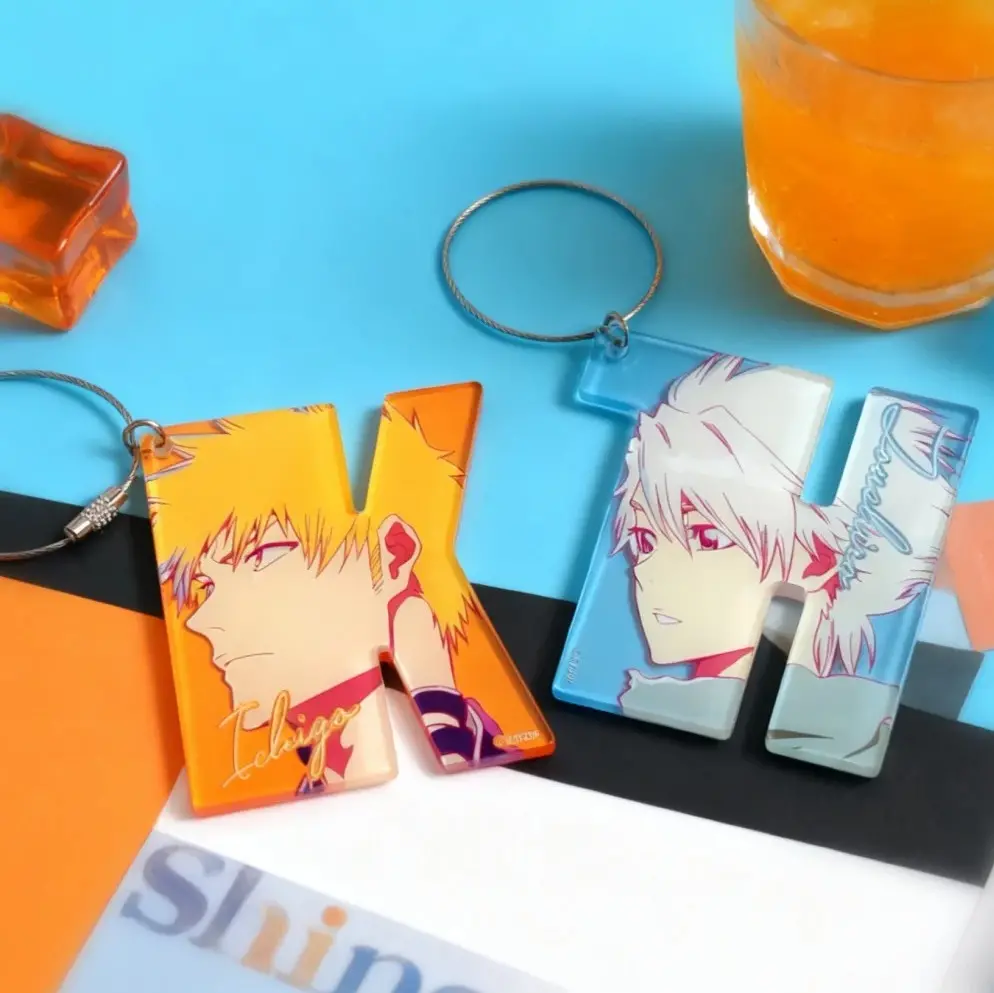
The second distinguishing fact is that substrate variety here is a creative variable, not a neutral carrier. Seven board types — clear, glitter, rainbow, mica, starry-sky, pink chameleon, blue chameleon — each behave differently under a print layer. A glitter or starry-sky board actively contributes sparkle to any open area in your design. A chameleon board shifts colour with viewing angle. If you finalise artwork on the assumption of a white background and then switch to clear acrylic, the entire colour relationship changes. Lock in the substrate first.
Setting Up the Artwork
Open your chosen variant in Popecho's onsite editor and select your size (30 mm to 150 mm longest dimension), hardware style, and — critically — board material before touching the canvas. Once you confirm the variant, the editor loads the die-cut outline for that size automatically, so the cut boundary and hardware-hole zone are already visible when you start placing art.
Safe-zone logic here is specific: keep all key art and any text at least 5 mm clear of the top-edge hardware attachment point. A character face or logo centred too high will be partially obscured by the hook in real life, even if it looks fine flat on screen.
Background handling depends on your substrate choice. On clear, rainbow, mica, and chameleon boards, unprinted regions are transparent — the acrylic itself is the background. If you want colour to read solidly without washout when the charm is held against clothing or a dark bag, you'll need a white ink backing layer behind your artwork (see the surface decisions section below). On glitter and starry-sky boards, open areas let the substrate texture show through as a deliberate feature — lean into it or suppress it with a white layer, depending on your intent. The editor flags resolution issues on upload, so confirm your file passes before submitting.
Surface and Production Decisions
CNC precision cutting is what produces the clean, odour-free edges this format is known for. The CNC path follows your die-cut silhouette exactly, which means complex custom outlines are achievable — but structural limits apply. Any bridge between design elements narrower than roughly 2 mm risks breaking under normal handling. Avoid isolated thin protrusions on custom shapes; if your character has fine antenna or narrow ribbon ties, route the cut slightly wider at those points or simplify the silhouette.
Print behaviour on specialty boards deserves a direct callout. Chameleon and rainbow boards produce iridescent colour shifts beneath the print layer, which means bold flat-colour art reads differently than on clear board. A deep red on clear will still look like that red; on a blue chameleon board, the substrate hue bleeds into the perception of the printed colour. The practical fix: proof your artwork on the specific board type before committing to a full run. Start with a single-piece order (MOQ is 1 pc) to validate substrate interaction before scaling.
White ink is not a listed layer option in the editor for this product, but a white backing strategy matters on transparent substrates. If your character art relies on colour accuracy, design a white fill layer behind the artwork so it functions as an opaque base. Without it, colours appear washed out or shift depending on what the charm is resting against.
Popecho's production lead time for this product is 13 days.
What Trips Creators Up
Art placed in the hardware-hole zone. The ring or hook attachment point covers the top ~5 mm of the charm. Creators who centre a face or logo too high lose part of the design to the hardware. Confirm the dead zone in the editor before composing.
Choosing substrate after finalising art. Switching from clear to chameleon, or from glitter to mica, after artwork is done often means reworking the entire background logic. Pick the board first; build the art to it.
Ordering 3 cm or 4 cm with fine detail. At 30–40 mm, thin line art and small text often fail to reproduce cleanly. If your design has intricate linework, go to at least 6 cm or simplify the art for the smaller size.
Assuming both faces need artwork. The charm rotates freely on the hook, so the back is visible. If you are only printing one side, the unprinted face will show the raw substrate. Decide intentionally whether the back is part of the design or a deliberate material display.